

Loft ConversionIdeas, Planning and Inspiration for your Dream Loft Conversion from Model Projects
Thinking About a Loft Conversion?
You’re in the right place. This page is designed to offer inspiration, practical ideas, and help you plan the best route forward for your project.
Why consider a loft conversion?
A loft conversion is one of the smartest ways to unlock the full potential of your home. It transforms underused roof space into valuable living accommodation whether that’s an extra bedroom, a home office, or a peaceful retreat. Compared to other types of extensions, it’s often less disruptive to both you and your neighbours. Plus, it can significantly improve the thermal efficiency of your property by adding insulation to the roof space.
What to Consider When Planning a Loft Conversion
Below, we’ll explore three key areas to help you plan and optimise your loft conversion:
Planning Routes & Options
Space, Form & Construction Types
Style & Appearance
Our goal is to inspire you and give you a clear understanding of what's possible. If you’d like tailored advice or have any questions, feel free to get in touch…
Planning Routes & Options
In this chapter we will compare and review the two main routes for a planning application.
Permitted Development vs Homeowner Full Planning Application
Permitted Development
Permitted Development is a national law
Neighbours are not consulted
Planners can only check that the proposed scheme meets the regulations
Homeowner Full Planning Application
Local Authority local planning guidelines
Neighbours are consulted
Planners have an option to comment/ affect the proposed scheme
“By utilising the Permitted Development Rights already attached to your home you can bypass the conventional planning process. There are enormous benefits to this route such as bigger lofts and extensions, more extensive glazing and large out buildings, to name but a few.”
Under permitted development you are allowed to add the following volume (m3):

40m3
Terrace Houses

50m3
Semi-detached & Detached Houses
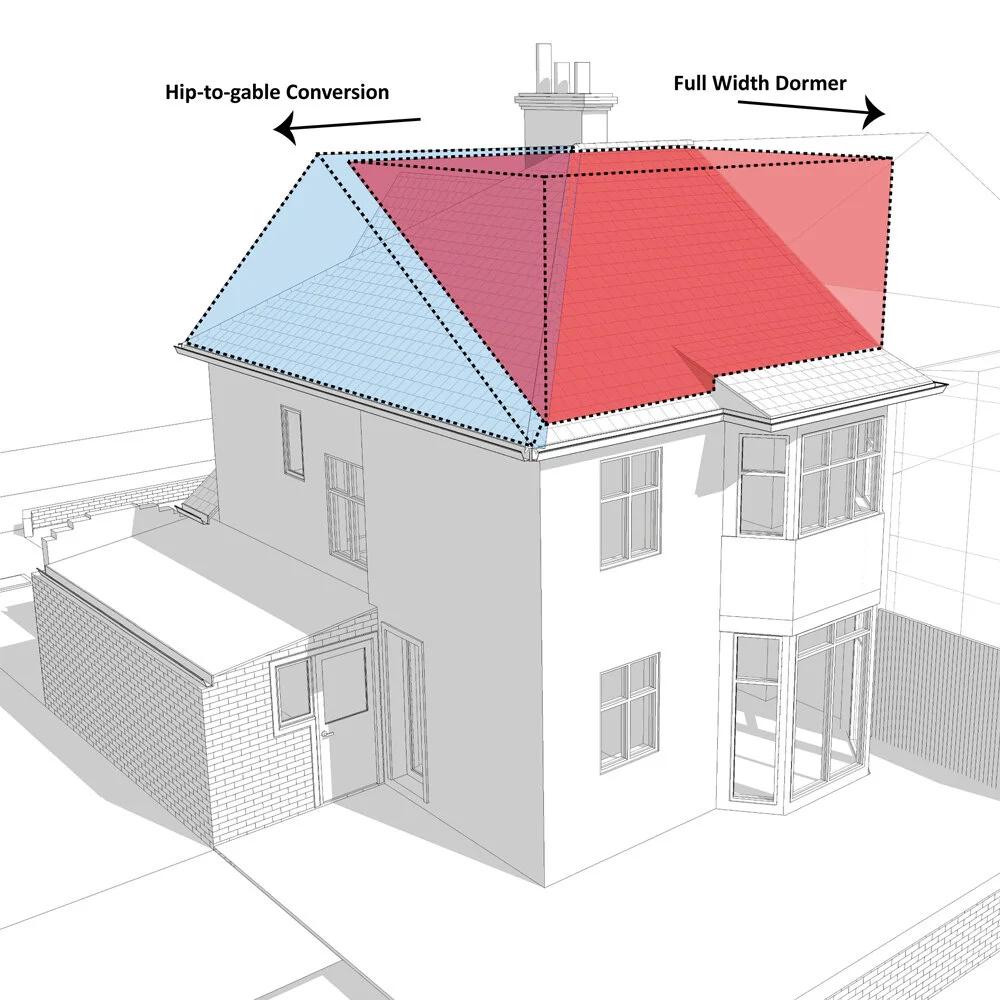
It is important to note that it is only the volume added and this is taken from the external dimensions only. Please see below an example of volume added to a 1930’s semi-detached property in the form of a hip-to-gable and full width rear dormer.
How to apply for your planning application?
Permitted Development
If your property is not listed, not within a conservation area, has permitted development rights (PD) and the proposed scheme follows the rules of PD, then you will need to apply to the local authority for a Certificate of Lawfulness. Applying for a Certificate of Lawfulness follows similar procedures to that of a normal application. Basic drawings (plans, elevations & sections) are required, along with location plan and basic description of proposed works.
You, or your agent, can apply through the planning portal. We advise that you apply for a Certificate of Lawfulness before work commences (often taking around 8 weeks), but you can gain retrospective planning under PD.
Loft conversion falls under two main categories of the Permitted Development Rights:
Class B - This provides permitted development rights for the enlargement of a house consisting of an addition or alteration to its roof.
Class C - This provides permitted development rights for any other alteration to the roof of a house. Such alterations will not involve any enlargement of the house, but would, for example, cover the installation of roof lights/windows.
-
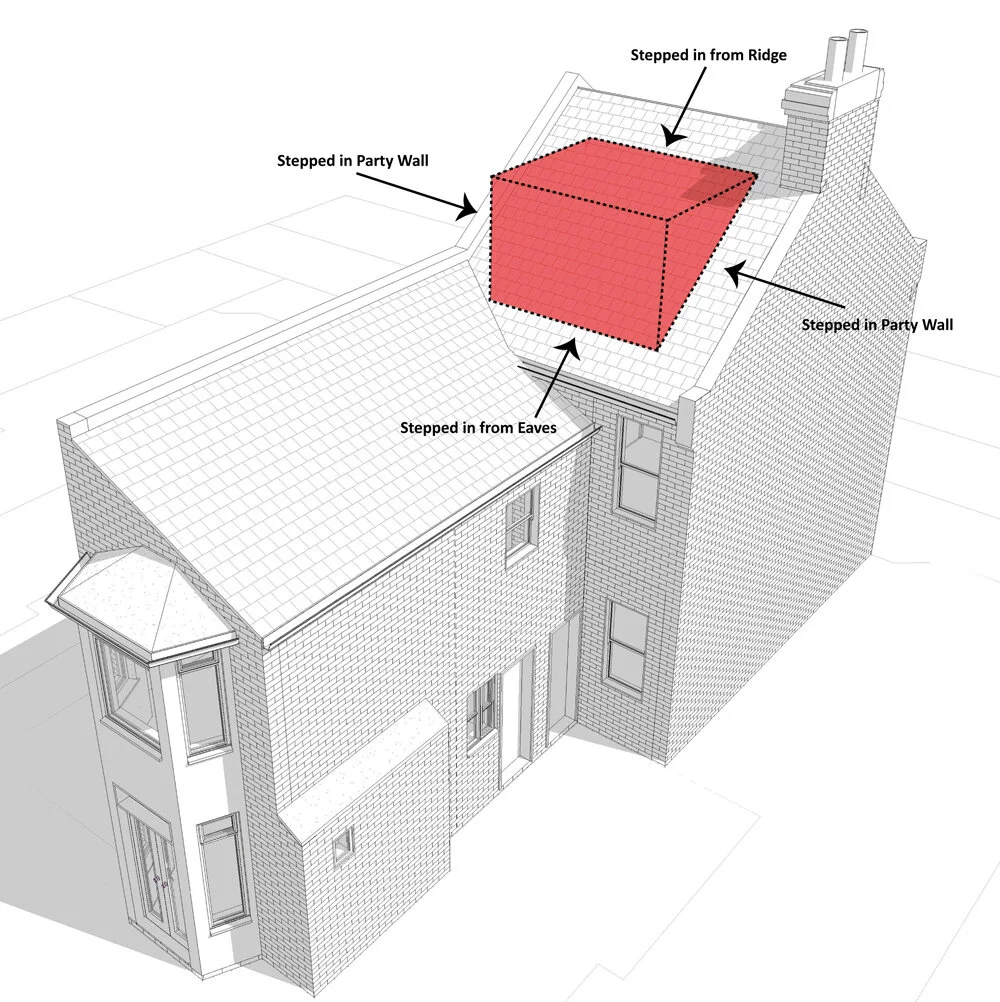
Any new addition including a dormer of hip-to-gable cannot extend higher than the highest part of the existing roof (ridge line, not chimneys, parapets or flues).
A dormer cannot extend beyond the plane of existing roof slope that forms the principal elevation of the house and fronts a highway.
As stated above any addition to the roof cannot exceed a volume of 40m3 for a terraced and 50m3 for semi-detached or detached properties.
Balconies or raised platforms are not permitted under this class.
If the property is within a conservation area or area of outstanding natural beauty roof additions are not permitted under PD.
All external materials should match that of the existing house.
Any proposed dormers should be stepped in by 200mm from the existing eaves line.
A new window proposed to a side window would need to be obscure glazed.
Rooflights are permitted on any roof slope.
Full Planning Application
if your property does not have permitted development you will be required to submit a homeowner full planning application. Unlike permitted development a full planning application will follow the local authorities design guidelines. It is also noted that your neighbours will be consulted under a homeowner full planning application.
As above basic drawings (plans, elevations & sections) are required, along with location plan and basic description of proposed works, will be required to be submitted through the planning portal.
Semi-detached 1930's Case Study
Below we have picked a typical 1930’s semi-detached house to review the rooms and spaces that can be achieved through permitted development rights.
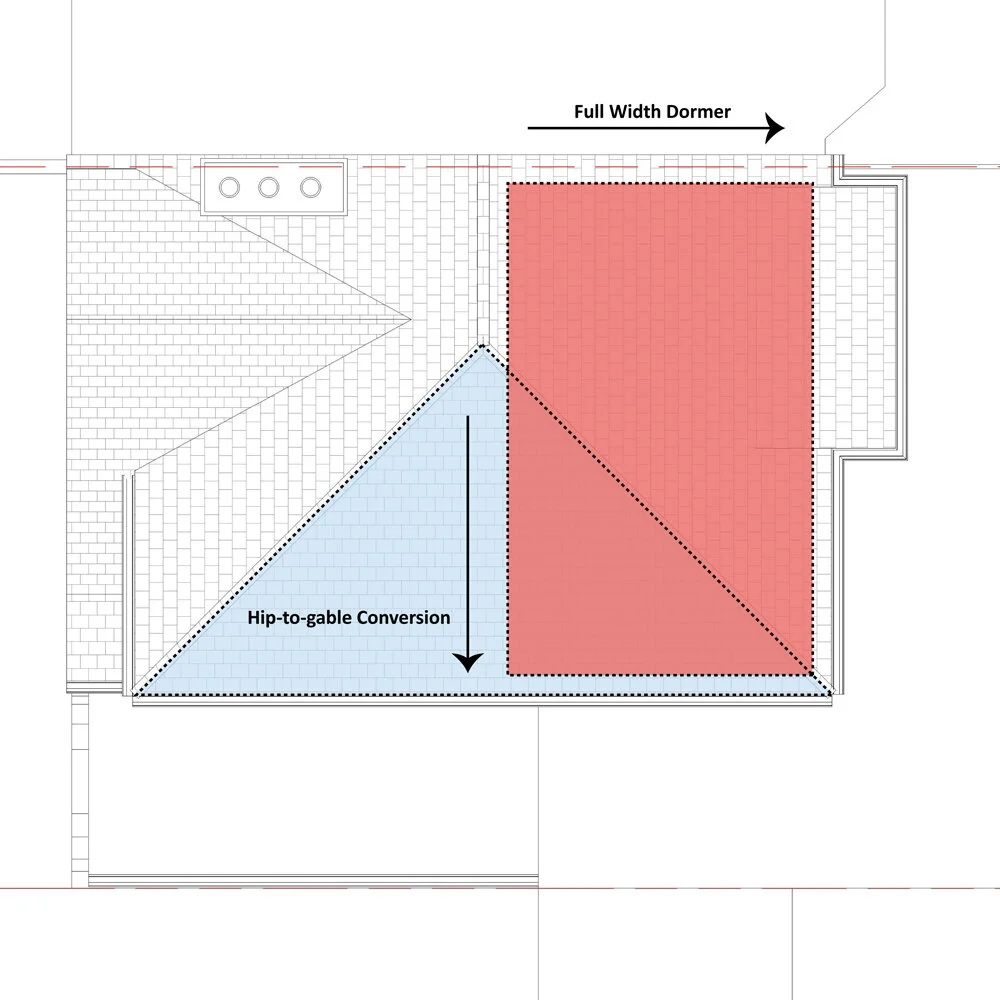
Through the property’s permitted development rights, this property has a hip-to-gable loft conversion with an external volume of 20m3 and a full width rear dormer (external volume of 30m3). This uses the complete allowance of 50m3 to increase usable space within the loft.
The total footprint of the existing loft is 46m2 (please note you can only stand up in a small percentage of the existing loft space). Therefore the proposed internal footprint is 30m2, this is a use of 65% of the existing footprint.
As you can see from the floorplan below a master bedroom, ensuite, dressing room area and circulation space is achieved. Creating a spacious master suite at the top of the house.
The remaining space to the front within the sloping eaves is utilised for storage.
Space, Form & Construction Types
What are the key elements to consider when planning the loft conversion, alongside the best planning route explored in the first chapter?
What is the head height in the existing loft, (measuring from the top of the ceiling joists to the underside of the ridge beam)? What is the minimum requirement? If the ridge height is less than 2100mm then a loft conversion is not possible without lowering the ceilings or raising the ridge. In some cases under full planning you would be able to raise the ridge height (detached only). In most cases the existing loft ceiling joists (circa 100mm) are insufficient for a floor structure. In this case new floor joists/ beams will be required, these are a minimum of 220mm.
It is also important to take into consideration the existing roof structure.
Traditional frame roof structures are often the most suitable type for loft conversions, allowing the space to be opened up relatively easily and inexpensively. The rafters may need to be strengthened or additional supports added (your structural engineer will advise on what is required).
Trussed roofs require greater structural input, normally involving the insertion of steel beams between load bearing walls for the new floor joists to hang on and the rafter section to be supported on — together with a steel beam at the ridge.
Other things that need to be taken into consideration are existing water tanks and chimneys as these can affect the layout and structural requirement.
How to add volume through various types of dormers..
Position and Design of Staircase into Loft
The position of the staircase going up into the loft is a key element of the design. Where possible it is desirable to position the staircase going into the loft, above the staircase from ground to first floor. This is beneficial because this minimises the space lost on the first floor. The section through the staircase is key as it needs to be a minimum head height of 2000mm.
The building regulations for fire safety change when building over two storeys. These changes require you to have a continuous circulation from top to bottom, including the staircases. All of the doors going from the circulation space into habitable rooms (living, dining, kitchen & bedrooms) need to be 30min fire rated. Alternatively you can put a connected smoke alarm into each habitable room, along with one to each floor off the circulation space (these are required anyway for each floor of the circulation space). If the staircase is open to a habitable room then a sprinkler system may be required.
Rooflights can also be used as a secondary means of escape for a loft conversion.
Key notes on the staircase (Building Regulations): Going: 220mm min Rise: 220mm max Pitch: 42 degrees max Headroom: min 2m Landing: at least the width of stairs Handrails: between 900-1000mm
Style & Appearance
External appearance and claddings
The external appearance of a loft conversion can take on a variety of architectural styles, depending on your design goals.
One popular route is to match the style and period of the existing property. A good example is a traditional mansard roof on a Victorian home. In this case, the flank (party) walls are typically built up using London stock brick, while the rear dormer is finished with slate tile cladding and fitted with traditional sash windows helping the extension blend seamlessly with the original architecture.
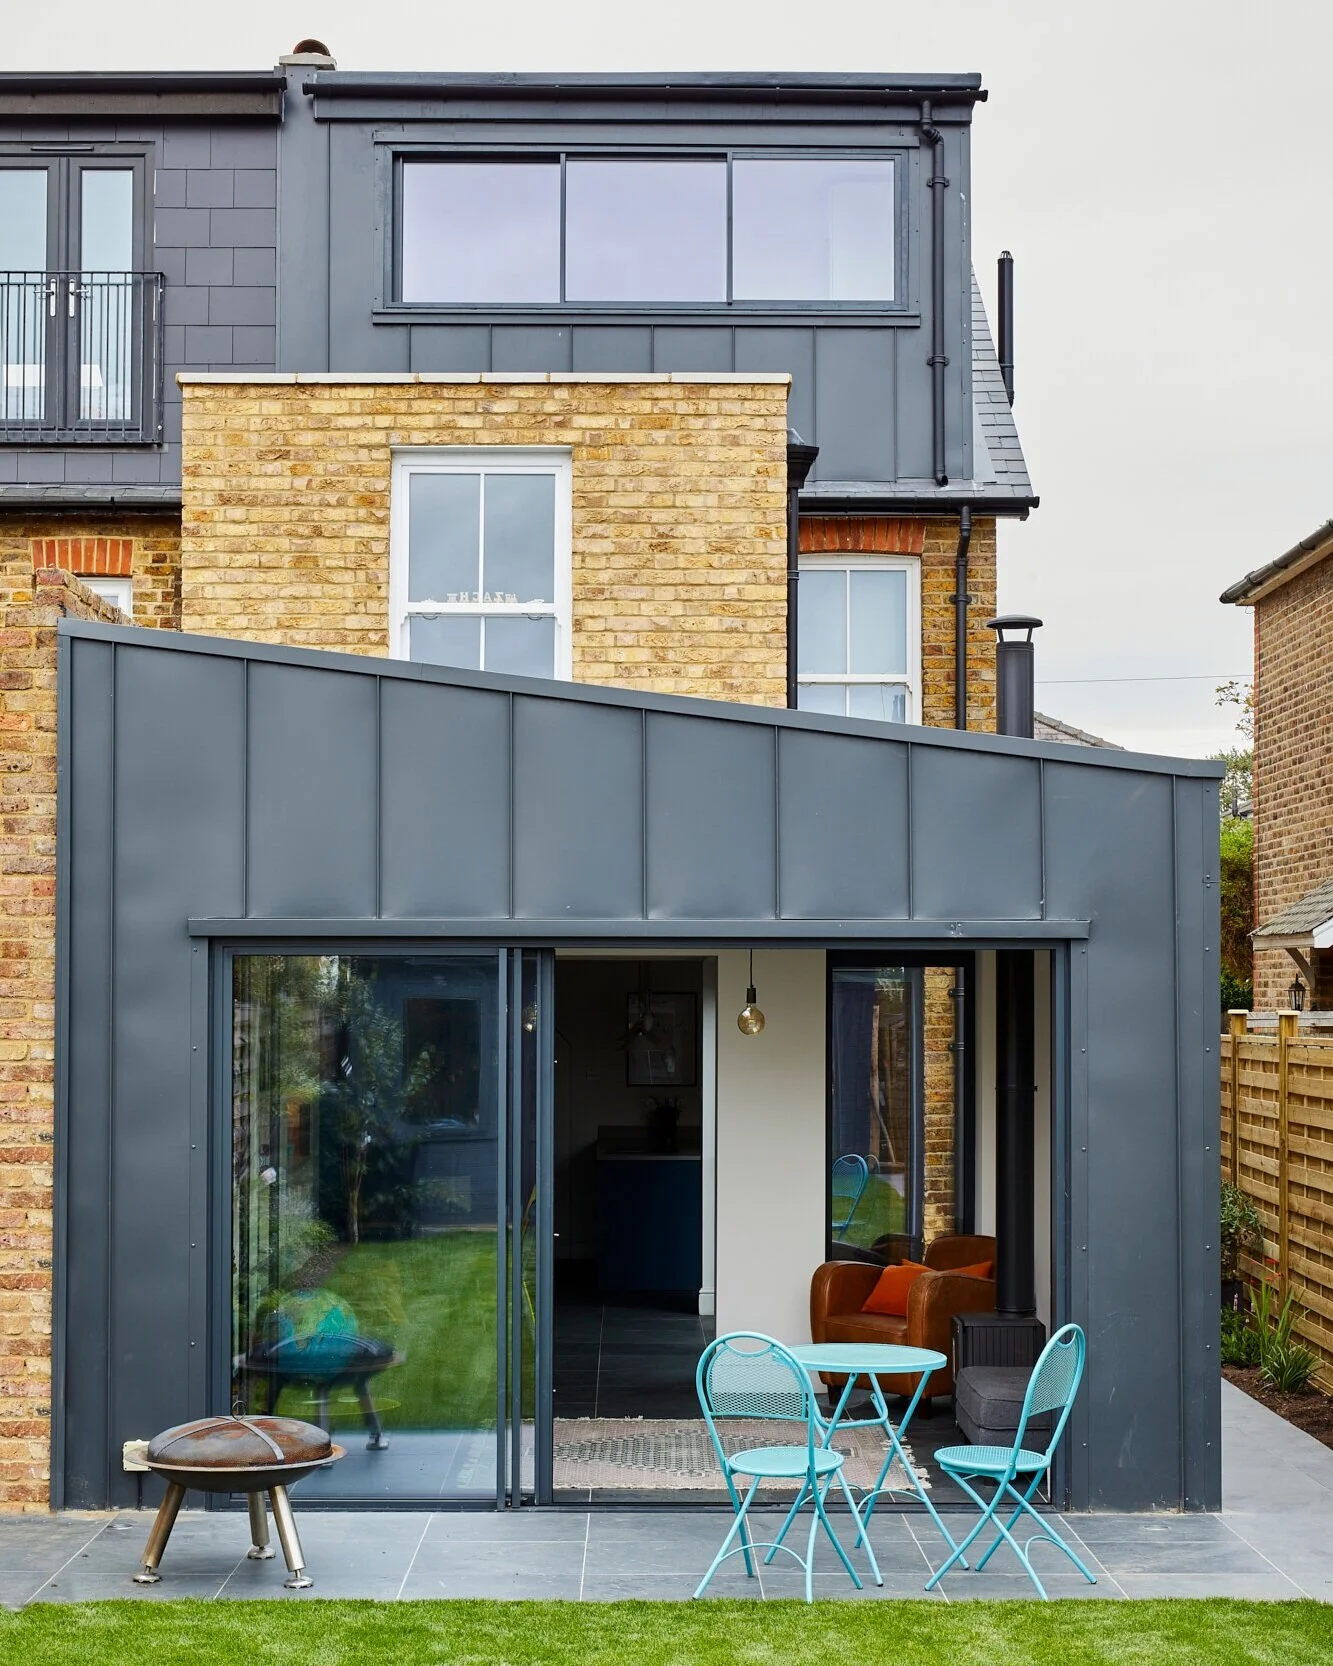
An alternative approach is to create a contrast between the new dormer and the existing house. For example, a project completed by Model Projects in South-West London involved a hip-to-gable extension and a full-width rear dormer clad in anthracite grey metal standing seam panels. The contemporary finish offered a striking contrast against the rustic tones of the original London stock brick.
Other cladding options include timber weatherboarding, zinc, copper, or even stone each offering its own unique aesthetic.
Whichever material you choose, it’s important to factor in durability and maintenance. As dormers are located at height, future maintenance can be more challenging and may require scaffolding. With that in mind, low-maintenance materials such as metal cladding or composite weatherboarding are often a smart long-term investment.
To see more of this project please click here.
Bringing in natural light into the loft space.
One of the most effective ways to make a loft conversion feel light, spacious, and welcoming is to maximise natural daylight. The choice and placement of windows plays a key role in achieving this.
Since loft conversions are located at the top of the house, they often enjoy some of the best views. Incorporating large windows not only enhances the sense of space but also allows you to fully appreciate the surrounding outlook.
Windows and doors for loft conversions come in a wide variety of sizes, styles, and formats from classic rooflights and dormer windows to expansive sliding or bi-folding doors. A great example is the South-West London project shown above, where a full-width dormer was fitted with a panoramic set of sliding windows, flooding the interior with daylight and framing the view beautifully.


Below are some potential options for windows and doors
Let the Light In with Rooflights
Rooflights are a fantastic way to introduce natural daylight into your loft space. Unlike dormers, rooflights or conservation rooflights are often permitted on the front slope of the roof without requiring planning permission, making them a simple and effective design solution.
Not only do they brighten up the space, but they also enhance natural ventilation, which is essential for comfort and airflow in any loft conversion.
Fitted on sloped roofs, rooflights can also help increase head height in key areas making ensuites, hallways, and circulation spaces feel more generous and open.
Top Tips when designing a loft space!!
Maximise Eaves Space for Storage
Don’t let those awkward angles go to waste! Eaves areas are perfect for clever storage solutions from simple cupboards to under-eaves drawers. These hidden spots can help keep your loft tidy and functional.Tuck Bathrooms into the Void
Utilise lower ceiling areas to fit in a bathroom or ensuite. Positioning the toilet or bath under the slope makes smart use of space without compromising comfort or style.Go Bespoke with Fitted Wardrobes
Tailor-made wardrobes are ideal for sloping ceilings and tricky corners. Custom designs can wrap around chimney stacks or other structural features, giving you seamless storage that looks great and works hard.